// // Leave a Comment

Update Galaxy Note 2 N7100 to XXUEMK9 Android 4.3 Jelly Bean Official Firmware

The wait is finally over! Galaxy Note 2 Update is now available. Samsung has just started rolling out Android 4.3 update for the Galaxy Note 2 N7100. It’s been a long time since Samsung updated the Galaxy Note 2 to a new version of Android. Samsung never updated the Galaxy Note 2 to Android 4.2.2 and even also never internally tested a single Android 4.2.2 build for the Note 2. The Galaxy Note 2 launched with Android 4.1.2 Jelly Bean, but now it can be upgrade to Android 4.3 Jelly Bean Official Firmware.

You can now Install this firmware on your phone with the most easy instructions. For those who are not able to download this update from Samsung KIES,  can grab this latest update for Galaxy Note 2 N7100 from the tutorial below . You do not need to have ClockworkMod recovery installed or a rooted phone in order to install this update manually. You can easily update Galaxy Note 2 Android 4.3 Jelly Bean Official Firmware from this tutorial.

Galaxy Note 2 N7100
Galaxy Note 2 with Official Android 4.3 Jelly Bean

Improvement and New Features in this ROM :

  • GALAXY GEAR Support
  • TRIM Support (Makes the device much faster)
  • Samsung KNOX
  • Samsung Wallet (Pre-loaded)
  • Better RAM management
  • Core UI elements updated to the ones on the Galaxy S4 (Galaxy S4′s theme all over)
  • New Samsung Keyboard
  • GPU drivers have been updated (Higher GPU benchmark scores)
  • New Lockscreen: Multiple Widgets, improved ripple effect than Android 4.1.2, ability to change clock size and set a personal message
  • New screen modes (From S4): Adapt Display and Professional Photo
  • Daydream
  • Driving mode
  • Actionable notifications
  • Move-to-SD-card feature
  • New Camera mode : Sound and Shot
  • New Additions in Notification Centre
  • Completely revamped Settings UI (Tabbed interface – Exactly like the Galaxy S4)
  • Implementation of Voice controls (Let’s you control various parts of the phone using voice commands – Galaxy S4 feature)
  • New Samsung Apps: Calculator, Clock, Contacts, Gallery, Music
  • Full screen Samsung apps
  • New S-Voice (from Galaxy S4)

Android 4.3 XXUEMK9 Firmware Details:

Model: GT-N7100
Model name: GALAXY Note II
Country: Spain (Yoigo) (Black Edition)
Version: Android 4.3
Changelist: 2138564
Build date: Wed, 20 Nov 2013 10:22:31 +0000
Product Code: YOG
PDA: N7100XXUEMK9
CSC: N7100YOGEMK1
MODEM: N7100XXUEMJ9

There are tons of useful articles and how-to guides on MyTrickSource for the Samsung Galaxy Note 2, but we think you might be interested in the following posts:

Samsung Galaxy Note 2 N7100 USB Drivers

You will need to connect your Android phone with the computer. For that, please make sure you have installed the USB drivers for Samsung Galaxy Note 2 properly. If not, you can download the latest official drivers from our Android USB Drivers section here:
Download Galaxy Note 2 N7100 USB drivers!

Backup and Other Important Tips

Done with the USB drivers? Perfect. Now please take a look at the following tips and important points you need to take care of. These are important, as we don’t want anyone losing their personal data or apps:
Always backup your important data that you might need after you install a new custom ROM, an official software update or anything else. Make a backup for just in case, you never know when anything might go wrong. See below for some tips on how to backup data:
Samsung users can also back up data using Samsung KIES. If you backup data manually, you get more options what to choose from and it is very easy to move data across Android devices from different manufacturers, i.e moving Samsung Galaxy Note backup data to HTC One X.
    If you already have a custom recovery (ClockworkMod, TWRP etc.) installed on your phone, we strongly recommend a backup using that as it creates a complete image of your existing phone set up.

A few more optional tips that you should remember:

      1. Having problems connecting your Android phone to the computer? You need to enable USB debugging mode.

        2. Make sure your Android device is charged up to 80-85% battery level. Why? Because, if your phone goes off suddenly while installing a custom ROM, flashing an official firmware update or installing mods etc. — your phone might get bricked or go dead permanently. No one wants that, right?


        3. Most of the tutorials and how-to guides on MyTrickSource are for factory unlocked Android phones and tablets. We recommend NOT to try our guides if your phone is locked to a carrier, unless we have specified the carrier name or device model.


If you find the above tips useful and they were helpful to you, please consider giving us a +1 or LIKE on facebook to thank us!


All set and ready? Sensible. Now, let’s proceed with the tutorial below and update Galaxy Note 2 N7100 to XXUEMK9 Android 4.3 Jelly Bean Official Firmware.

How to Update Galaxy Note 2 N7100 to XXUEMK9 Android 4.3 Jelly Bean Official Firmware

We have put together a detailed step-by-step instructions guide on how to Update Galaxy Note 2 N7100 to XXUEMK9 Android 4.3 Jelly Bean Official Firmware. If you are used to installing official updates through ODIN on Samsung Galaxy devices, then this should not be any different for you.
Please read every line carefully and make sure you read the tutorial once before actually performing it on your Android device.

To Remember:

  • This tutorial is only for Samsung Galaxy Ace Duos S6802. Please don’t   try this on any other variants of the phone.
  • This is an unbranded firmware with no carrier apps installed on it.
  • Make sure you backup all your data in your phone before proceeding.
Rooting Warning: This is an official Android 4.3 XXUEMK9 update for Galaxy Note 2 N7100, which means you will lose root as soon as you install this update . You will again have to root Galaxy Note 2 to gain full system access and be able to install root apps again. We will post a full tutorial on how to root Galaxy Note 2 N7100 on Android 4.3 soon.

Entire Step-By-Step procedure:

 Step 1 - Download XXUEMK9 Android 4.3 for Galaxy Note 2 N7100 to your computer and extract the zip file.

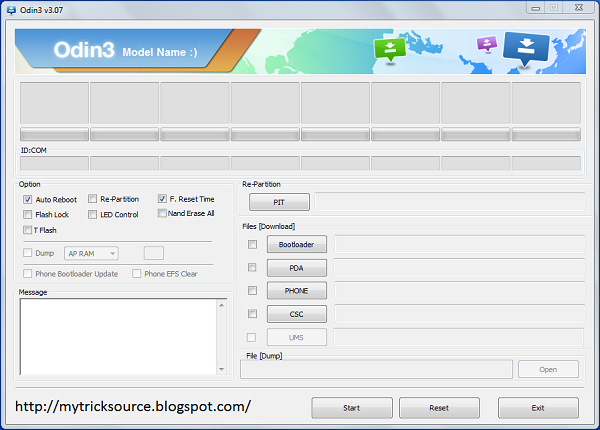
Step 2
 - Download ODIN v3.07 which will help you to install Android 4.3 on Galaxy Note 2.


Step 3 - Switch OFF your phone. Now go to Download Mode. How? Press and hold the Volume Down + Power buttons together, till you see the Samsung logo or the construction Android robot and a triangle. This is the Download Mode.

Step 4 - Make sure you have your Galaxy Note 2 USB drivers installed on your computer.


Step 5 - Open ODIN on your computer. Connect Galaxy Note 2 to your computer while the phone is in the Download Mode.


Step 6
 - If your phone is connected successfully, one of the ID:COM boxes will turn yellow with the COM port number. This step might take some time.


Step 7
 - Now select the files that you have to flash/install on your phone. These files are to be found from the extracted files in Step 1.

  • Click on ‘PDA’ and select file with ‘CODE’ in its name.
  • Click on ‘Phone’ and select file with ‘MODEM’ in its name. Ignore this step if there is no such file.
  • Click on ‘CSC’ and select file with CSC’ in its name. Ignore this step if there is no such file.
  • Click on ‘PIT’ and select the .pit file. Ignore this step if there is no such file.
Step 8 - In ODIN, check the Auto Reboot and F. Reset Time options. As for the Re-Partition option, check it ONLY if you selected a .PIT file in the above step.

Step 9 - Now click on the Start button in ODIN. Installation process will start and would take a few minutes to complete.


Step 10 - After the installation is completed, your phone will restart. After you see the home screen, unplug your phone from the computer.


That’s it. Your Samsung Galaxy Note 2 N7100 has now been updated to XXUEMK9 Android 4.3 firmware. Go to Settings > About phone to verify.


Hit +1 or LIKE on Facebook to thank us!


If you run into any issues, be happy to drop us a comment below and that we can reply you back ASAP with the fix or the answer to your drawback.
Read More
// // Leave a Comment

Update Galaxy Grand I9082 to Android 4.4.2 KitKat Custom Firmware

Android 4.4.2 KitKat Custom Firmware is now available for Galaxy Grand I9082. A new custom build with the latest firmware updates can be downloaded for this phone. Android 4.4 KitKat brings together some of the best tweaks and features of several custom firmwares in one ROM. This custom firmware contains the standard and coolest features that will make you love your phone even more! You can Install Android 4.4 on Galaxy Grand using the tutorial below. Your Galaxy Grand I9082 should be rooted and have a custom recovery (ClockworkMod recovery / TWRP recovery) installed. This is not an official release by Samsung, but just a custom ROM which would require a custom recovery in order to flash the ROM zip and Google Apps zip files on your phone.

Galaxy Grand I9082

As you continue reading, we will guide you through the entire process of how to Install Android 4.4 KitKat Custom firmware on Galaxy Grand I9082 with all the steps required to do so. Please make sure you backup your data as it will be all wiped clean.

Disclaimer: All the custom ROMs and firmwares, official software updates, tools, mods or anything mentioned in the tutorial belong to their respective owners/developers. We (MyTrickSource) or the developers are not to be held responsible if you damage or brick your device. We don’t have you on gun point to try out this tutorial :)

There are tons of useful articles and how-to guides on MyTrickSource for the Samsung Galaxy Grand, but we think you might be interested in the following posts:
Like this Android 4.4 KitKat Custom ROM ? We love it too and we know you are looking forward to install it on your phone now. Now please read below for important tips on how to make sure your installation goes smooth and you do not end up with any problems.

Samsung Galaxy Grand USB Drivers

You will need to connect your Android phone with the computer. For that, please make sure you have installed the USB drivers for Samsung Galaxy Grand properly. If not, you can download the latest official drivers from our Android USB Drivers section here:

Backup and Other Important Tips

Done with the USB drivers? Perfect. Now please take a look at the following tips and important points you need to take care of. These are important, as we don’t want anyone losing their personal data or apps:
Always backup your important data that you might need after you install a new custom ROM, an official software update or anything else. Make a backup for just in case, you never know when anything might go wrong. See below for some tips on how to backup data:
      Samsung users can also back up data using Samsung KIES. If you backup data manually, you get more options what to choose from and it is very easy to move data across Android devices from different manufacturers, i.e moving Samsung Galaxy S3 backup data to HTC One X.

          If you already have a custom recovery (ClockworkMod, TWRP etc.) installed on your phone, we strongly recommend a backup using that as it creates a complete image of your existing phone set up.

       A few more optional tips that you should remember:

              1. Having problems connecting your Android phone to the computer? You need to enable USB debugging mode.

              2. Make sure your Android device is charged up to 80-85% battery level. Why? Because, if your phone goes off suddenly while installing a custom ROM, flashing an official firmware update or installing mods etc. — your phone might get bricked or go dead permanently. No one wants that, right?

              3. Most of the tutorials and how-to guides on MyTrickSource are for factory unlocked Android phones and tablets. We recommend NOT to try our guides if your phone is locked to a carrier, unless we have specified the carrier name or device model.

      If you find the above tips useful and they were helpful to you, please consider giving us a +1 or LIKE to thank us!

      All set and ready? Good. Now, let’s proceed with the tutorial below and update Galaxy Grand to Android 4.4 KitKat Custom Firmware.

      How to Install Android 4.4 KitKat Custom ROM on Galaxy Grand :

      We have put together a detailed step-by-step instructions guide on how to Install Android 4.4 KitKat Custom ROM on Galaxy Grand I9082. If you are used to installing custom ROMs on your Galaxy Grand I9082, then this should not be any different for you.
      However, for beginners, you need to root your Galaxy Grand I9082 and install a custom recovery. Please Google that up if you are unsure and make sure you read the tutorial once before actually performing it on your device.

      To Remember:
      • This tutorial is only for installing Android 4.4 KitKat Custom ROM on Galaxy Grand I9082. Please do not try on any other Galaxy variants.
      • Your phone should be rooted and have ClockworkMod recovery installed from before.
      • This tutorial will wipe out all your data. Proceed at your own risk.
      • Perform a Dalvik Cache wipe before proceeding from the recovery mode.
      • Samsung KIES will NOT detect your phone after installing this ROM because it is a custom firmware.
      • Make sure you backup all your data in your phone before proceeding.

      Entire Step-By-Step Instructions:

      Step 1 - Download Android 4.4 KitKat and Google Apps for Galaxy Grand I9082 to your computer.

      Step 2 - Connect and mount your Galaxy Grand USB memory on your computer using the USB cable.

      Step 3 - Now copy/paste the downloaded Android 4.4 KitKat zip file to your SD card. Make sure the file is in the SD card root (not in any folder).

      Step 4 - Then turn OFF your phone and disconnect from the USB cable.

      Step 5 - Now to get in the Recovery Mode. Switch ON the phone while pressing and holding Volume Up + Home + Power buttons together. You will get an exclamation mark now. Again, hold your Volume Up + Power buttons. You should now be in your Recovery Mode. 

      Step 6 - Once you are in ClockworkMod Recovery, select perform a full data wipe by selecting “wipe data/factory reset”  Use the Power button to select everything while in the Recovery Mode.

      Step 7 - Then, perform a cache wipe by selecting “wipe cache partition”.

      Step 8 - Now this is optional, but it is recommended to perform a wipe of your dalvik cache as well. You will not get into boot loops or any other errors. From CWM recovery, go to ‘advanced’ and then select “wipe dalvik cache”.

      Step 9 - Then go back to the main recovery screen and select “install zip from SD card”.

      Step 10 - Now select “choose zip from sdcard”. Using your volume keys, navigate to the Android 4.4 KitKat zip file that you copied to your SD card and select it using the Power button. Confirm the installation on the next screen and the installation procedure should start now.

      Note: Repeat this step with Google Apps after installing the ROM.

      Step 11 - After the installation completes, go to “+++++Go Back+++++” and reboot the phone by selecting “reboot system now” 

      Your Galaxy Grand I9082 will boot now and it might take about 5 minutes to boot on your first time. So, please wait.
      That’s it! Your Galaxy Grand should now have Android 4.4.2 KitKat Custom ROM installed on your phone! Go to Settings > About phone to verify.

      Hit +1 or LIKE to thank us!

      Need Help?

      If you run into any problems in Installing Android 4.4 KitKat Custom ROM on Galaxy Grand I9082 , feel free to drop us a comment below and we will reply you back ASAP with the fix or the solution to your problem.
      Read More
      // // Leave a Comment

      Install MIUI 3 CM7 on Galaxy Y S5360 Custom Firmware

      MIUI 3 CM7 Custom ROM is now available for Galaxy Y S5360. A new nightly build with the latest firmware updates can be downloaded for this phone. MIUI 3 CM7 brings together some of the best tweaks and features of several custom firmwares in one ROM.  If you are interested in Android 4.1 for this phones, please check out here. The team behind MIUI 3 is known for adding the coolest features to this ROM that will make you love your phone even more! You can update Galaxy Y S5360 to MIUI 3 CM7 Custom Firmware using the tutorial below. Your Galaxy Y S5360 should be rooted and have a custom recovery (ClockworkMod recovery / TWRP recovery) installed. This is not an official release by Samsung, but just a custom ROM which would require a custom recovery in order to flash the ROM zip and Google Apps zip files on your phone.


      MIUI 3 CM7 Custom ROM on Galaxy Y S5360

      As you continue reading, we will guide you through the entire process of how to Install MIUI 3 CM7 Custom firmware on Galaxy Y S5360 with all the steps required to do so. Please make sure you backup your data as it will be all wiped clean.

      Disclaimer: All the custom ROMs and firmwares, official software updates, tools, mods or anything mentioned in the tutorial belong to their respective owners/developers. We (MTS) or the developers are not to be held responsible if you damage or brick your device. We don’t have you on gun point to try out this tutorial :)

      MIUI 3 CM7 Custom ROM Features:

      • Over 200 functions (Making life a bit easier).
      • Phone & SMS (Better Call & SMS Experience).
      • Reliable Privacy Protection.
      • Equipped with Kingsoft, Wall-E, LBE and other security software to protect device contents.
      • Customization on another Level.
      • Personalized themes, numerous lockscreens & variety of MISpace to choose from. 
      • Special Front Sizes (Suitable of your Retina).
      • Music, Gallery, Calculator, Camera, FM Radio, Sound Recorder, Compass & Updater. 
      There are tons of useful articles and how-to guides on MyTrickSource for the Samsung Galaxy Y, but we think you might be interested in the following posts:
      Like this MIUI 3 CM7 Custom ROM ? We love it too and we know you are looking forward to install it on your phone now. Now please read below for important tips on how to make sure your installation goes smooth and you do not end up with any problems.

      Samsung Galaxy Y USB Drivers

      You will need to connect your Android phone with the computer. For that, please make sure you have installed the USB drivers for Samsung Galaxy Y properly. If not, you can download the latest official drivers from our Android USB Drivers section here:
      Download Samsung Galaxy Y USB drivers!

      Backup and Other Important Tips

      Done with the USB drivers? Perfect. The tutorial is on the next page, but first, please take a look at the following tips and important points you need to take care of. These are important, as we don’t want anyone losing their personal data or apps:
      Always backup your important data that you might need after you install a new custom ROM, an official software update or anything else. Make a backup for just in case, you never know when anything might go wrong. See below for some tips on how to backup data:

           Samsung users can also back up data using Samsung KIES. If you backup data manually, you get more options what to choose from and it is very easy to move data across Android devices from different manufacturers, i.e moving Samsung Galaxy S3 backup data to HTC One X.

              If you already have a custom recovery (ClockworkMod, TWRP etc.) installed on your phone, we strongly recommend a backup using that as it creates a complete image of your existing phone set up.

           A few more optional tips that you should remember:

                  1. Having problems connecting your Android phone to the computer? You need to enable USB debugging mode.

                  2. Make sure your Android device is charged up to 80-85% battery level. Why? Because, if your phone goes off suddenly while installing a custom ROM, flashing an official firmware update or installing mods etc. — your phone might get bricked or go dead permanently. No one wants that, right?

                  3. Most of the tutorials and how-to guides on MyTrickSource are for factory unlocked Android phones and tablets. We recommend NOT to try our guides if your phone is locked to a carrier, unless we have specified the carrier name or device model.


          If you find the above tips useful and they were helpful to you, please consider giving us a +1 or LIKE to thank us!

          All set and ready? Good. Now, let’s proceed with the tutorial below and update Galaxy Y S5360 to MIUI 3 CM7 Custom Firmware.

          HOW to Install MIUI 3 CM7 Custom ROM on Samsung Galaxy Y S5360

          We have put together a detailed step-by-step instructions guide on how to install MIUI 3 CM7 Custom ROM on Galaxy Y S5360. If you are used to installing custom ROMs on your Galaxy Y S5360, then this should not be any different for you.
          However, for beginners, you need to root your Samsung Galaxy Y and install a custom recovery. Please Google that up if you are unsure and make sure you read the tutorial once before actually performing it on your device.

          To Remember:
          • This tutorial is only for installing MIUI 3 CM7 Custom ROM on Galaxy Y S5360. Please do not try on any other Galaxy Y variants.
          • Your phone should be rooted and have ClockworkMod recovery installed from before.
          • This tutorial will wipe out all your data. Proceed at your own risk.
          • Perform a Dalvik Cache wipe before proceeding from the recovery mode.
          • Samsung KIES will NOT detect your phone after installing this ROM because it is a custom firmware.
          • Make sure you backup all your data in your phone before proceeding.

          Entire Step-By-Step Instructions:

          [RECOMMENDED] Be on a stock ROM, Installation will be cleaner.

          Download THIS EXT4 tool, the Kernel and the Rom on your device.
          Flash on Samsung recovery (or your recovery if you are not on stock).
          After the installation, flash the Kernel [Download it from here]
          When the Kernel is installed, go, on the CWM, to advanced  --> Reboot recovery  (This will Reboot the device, and turn it on on the new CWM of kernel). Now follow the process below.

          Step 1 - Download MIUI 3 CM7 Custom ROM  and Google Apps for Galaxy Y to your computer.

          Step 2 - Connect and mount your Galaxy Y USB memory on your computer using the USB cable.


          Step 3 - Now copy/paste the downloaded MIUI 3 CM7 zip file to your SD card. Make sure the file is in the SD card root (not in any folder).


          Step 4 - Then turn OFF your phone and disconnect from the USB cable.


          Step 5 - Now to get in the Recovery Mode. Switch ON the phone while pressing and holding Volume Up + Home + Power buttons together. You will get an exclamation mark now. Again, hold your Volume Up + Power buttons. You should now be in your Recovery Mode. 


          Step 6 - Once you are in ClockworkMod Recovery, select perform a full data wipe by selecting “wipe data/factory reset”  Use the Power button to select everything while in the Recovery Mode.


          Step 7 - Then, perform a cache wipe by selecting “wipe cache partition” as you can see in the image below.


          Step 8 - Now this is optional, but it is recommended to perform a wipe of your dalvik cache as well. You will not get into boot loops or any other errors. From CWM recovery, go to ‘advanced’ and then select “wipe dalvik cache”.


          Step 9 - Then go back to the main recovery screen and select “install zip from SD card”.


          Step 10 - Now select “choose zip from sdcard”. Using your volume keys, navigate to the MIUI 3 CM7 zip file that you copied to your SD card and select it using the Power button. Confirm the installation on the next screen and the installation procedure should start now.


          Note: Repeat this step with Google Apps after installing the ROM.

          Step 11 - After the installation completes, go to “+++++Go Back+++++” and reboot the phone by selecting “reboot system now” 


          Your Galaxy Y S5360 will boot now and it might take about 5 minutes to boot on your first time. So, please wait.

          That’s it! Your Galaxy Y should now have MIUI 3 CM7 Custom ROM installed on your phone! Go to Settings > About phone to verify.

          Hit +1 or LIKE to thank us!

          Need Help?

          If you run into any problems in Installing MIUI 3 CM7 Custom ROM on Galaxy Y S5360 , feel free to drop us a comment below and we will reply you back ASAP with the fix or the solution to your problem.
          Read More
          // // Leave a Comment

          Install ClockworkMod Recovery 6 on Galaxy S5 G900F / G900H

          Samsung Galaxy S5 G900F / G900H can now be updated with ClockworkMod Recovery (CWM6) — one of the famous custom recovery for Android devices that is available for almost every Android phone or tablets. Galaxy S5 G900F is the LTE variant and Galaxy S5 G900H is the 3G version of the phone, and both can now have the latest ClockworkMod 6 recovery for flashing root mods and other ZIP files. You can install ClockworkMod Recovery 6 on Galaxy S5 G900F / G900H with Android 4.4.2 KitKat official firmware using the tutorial below. Please note, this tutorial is NOT firmware dependent, so it will work with future Android updates as well — including the latest Android 4.4.2 KitKat firmware!


          Disclaimer: All the custom ROMs and firmwares, official software updates, tools, mods or something mentioned within the tutorial belong to their several owners/developers. We have a tendency to Mytricksource or the developers don't seem to be command accountable if you injury or brick your device. We have a tendency to don’t have you ever on gun purpose to do out this tutorial.

          You may also like to see: 

          ClockworkMod Recovery 6 on Galaxy S5 G900F / G900H:

          This CWM Recovery will allow you to install custom ROMs, advanced options like formatting the system partition, making backups etc. The entire process has been given below on how to install this CWM Recovery onSamsung  Galaxy S5 G900F / G900H  phones.


          Clockworkmod CWM Recovery 6

          Our tutorial given below describes the entire process of how to install ClockworkMod Recovery 6 custom recovery on the following models of the Samsung Galaxy S5:
          • Samsung Galaxy S5 G900F (LTE)
          • Samsung Galaxy S5 G900H (3G)
          Samsung Galaxy S5 will be getting a huge list of custom ROMs, because of its popularity and most of them are installed using CWM. You can always enjoy the added benefits of a custom recovery with ClockworkMod 6.

          Samsung Galaxy S5 G900F / G900H USB Drivers

          You will need to connect your Android phone with the computer. For that, please make sure you have installed the USB drivers for Samsung Galaxy S5 G900F properly. If not, you can download the latest official drivers from our Android USB Drivers section here:

          Download Samsung Galaxy S5 G900F / G900H USB drivers!

          Backup and Other Important Tips

          Always backup your important data that you might need after you install a new custom ROM, an official software update or anything else. Make a backup for just in case, you never know when anything may go wrong. See below for some tips on how to backup data:
          Samsung users can also back up data using Samsung KIES. If you backup data manually, you get more options what to choose from and it is very easy to move data across Android devices from different manufacturers, i.e moving Samsung Galaxy S3 backup data to HTC One X.
              If you already have a custom recovery (ClockworkMod, TWRP etc.) installed on your phone, we strongly recommend a backup using that as it creates a complete image of your existing phone set up.

           A few more optional tips that you should remember:

                  1. Having problems connecting your Android phone to the computer? You need to enable USB debugging mode.
                  2. Make sure your Android device is charged up to 80-85% battery level. Why? Because, if your phone goes off suddenly while installing a custom ROM, flashing an official firmware update or installing mods etc. — your phone might get bricked or go dead permanently. No one wants that, right?

                  3. Most of the tutorials and how-to guides on MyTrickSource are for factory unlocked Android phones and tablets. We recommend NOT to try our guides if your phone is locked to a carrier, unless we have specified the carrier name or device model.


          If you find the above tips useful and they were helpful to you, please consider giving us a +1 or LIKE on facebook to thank us!


          All set and ready? Sensible. Now, let’s proceed with the steps below and update Samsung Galaxy S5 G900F / G900H with ClockworkMod Recovery 6.

          How to Install ClockworkMod Recovery 6 on Galaxy S5 G900F / G900H

          We have put together a detailed step-by-step instructions guide on how to install Install ClockworkMod Recovery 6 on Galaxy S5 G900F / G900H . If you are used to installing custom ROMs on your Galaxy S5 G900F, then this should not be any difficult for you.

          Please read every line carefully and make sure you read the entire process once before actually performing it on your Android device.


          To Remember:
          • This recovery installation tutorial is only for Galaxy S5 G900F / G900H. Please do not try on any other Galaxy S5 variants.
          • Make sure you backup all your data in your phone before proceeding as a precaution.
          • This CWM Recovery tutorial works with Android 4.4.2 and all future Android updates.
          • Go to Settings > About device on your Galaxy S5 and check your model no. It should be G900F or G900H or do not proceed.

          Entire Step-By-Step directions:

          Step 1 - Download ClockworkMod Recovery 6 package for Samsung Galaxy S5 and extract this file anywhere in your computer:
          NOTE: Make sure you select the appropriate file above for your Galaxy S5 model.
          Step 2 - Download ODIN v3.09 which will help you to install CWM Recovery on Samsung Galaxy S5 G900F / G900H.
           
          Step 3 - Switch OFF your phone. Now go to Download Mode. How? Press and hold the Volume Down + Home buttons together, and then press the Power button till you see the construction Android robot and a triangle. Press Power again to confirm to enter into Download Mode.
           
          Step 4 - Make sure you have your Samsung Galaxy S5 USB drivers installed on your computer.
           
          Step 5 - Open ODIN on your computer. Connect your phone to your computer while your phone is in the Download Mode.
           
          Step 6 - If your phone is connected successfully, one of the ID:COM boxes will turn yellow with the COM port number. This step might take some time.
           
          Step 7 - Now select the following file that you have to flash/install on your phone. This file will be found from the extracted file in Step 1.
          Click on ‘PDA’ / ‘AP’ and select the CWM package file you downloaded in step 1 for your phone.
           
          Step 8 - In ODIN, check the Auto Reboot and F. Reset Time options, if not already.
           
          Step 9 - Now click on the Start button in ODIN. Installation process will start and would take a few minutes to complete.
           
          Step 10 - After the installation is completed, your phone will reboot into Recovery Mode automatically and install the root package / files. Your ID:COM box will also turn green.
           
          Step 11 - After you see the home screen, unplug your phone from the computer.
           
          That’s it! Your Samsung Galaxy S5 has now been flashed with ClockworkMod Recovery. To enter Recovery Mode, shut down phone and then hold down the Home + Volume Up buttons and press the Power button for about 5 seconds to enter Recovery Mode.
           
          Hit +1 or LIKE to thank us!
           
          Whenever you restart your phone, stock recovery keeps showing up? There is a fix for that. For details on how to make ClockworkMod Recovery permanent on your Android phone, Please read the instruction given below carefully.

          How to Make ClockworkMod Recovery Permanent on Galaxy S5 G900F / G900H

          There is an auto recovery restore system built into stock firmwares so that after playing around with a custom recovery, you get back to stock recovery and never lose that access. However, for those who want to get rid of this, can follow the easy steps below.
           
          Your phone has to be already rooted to perform this. Simply rename or delete the following files from /system directory. These files overwrite the CWM recovery with the stock one.
           
          /system/recovery-from-boot.p
          /system/etc/install-recovery.sh

          Need Help?

          If you run into any problems, feel free to drop us a comment on our Facebook, Google+ or Twitter and we will reply you back ASAP with the fix or the solution to your problem.
          Read More
          // // 1 comment

          Update Galaxy S5 G900F to Omega v1.2 XXU1ANCF Android 4.4.2 Custom ROM

          Omega v1.2 is the first custom ROM for the Galaxy S5 G900F LTE. It is based on the official XXU1ANCF Android 4.4.2 KitKat firmware that was released on the launch day. Just like the usual Omega ROM for other Samsung devices, even this custom firmware comes with an initially long feature set which is expected to increase over time. Omega v1.2 is a very stable, based on stock firmware and fast custom ROM that we highly recommend. You can update Galaxy S5 G900F to Omega Android 4.4.2 KitKat custom firmware using our tutorial below. Your Galaxy S5 G900F should be rooted and have a custom recovery (ClockworkMod recovery / TWRP recovery) installed. This is not an official firmware release by Samsung, but just a custom ROM which would require a custom recovery in order to flash the ROM zip file on your phone.

          As you continue reading below, we will guide you through the entire process of how to install Omega v1.2 XXU1ANCF Android 4.4.2 Custom ROM on  Galaxy Galaxy S5 G900F using CyanogenMod. So don’t forget to backup all your apps and personal data as a precaution. It is always better to make a backup before doing anything with your Android device. This is an unofficial modified custom rom update by Android developers. The following tips are important as they will help the installation procedure to go smooth without any issues. Let’s continue with the tutorial now.
          Galaxy S5 G900F

          Disclaimer: All the custom ROMs and firmwares, official software updates, tools, mods or something mentioned within the tutorial belong to their several owners/developers. We have a tendency to Mytricksource or the developers don't seem to be command accountable if you injury or brick your device. We have a tendency to don’t have you ever on gun purpose to do out this tutorial.

          Must Read: Install ClockworkMod Recovery 6 on Galaxy S5 G900F

          Omega Android 4.4.2 Omega v1.2 XXU1ANCF ROM Details:

          This amazing Omega custom ROM comes with tons of new features and is based on Android 4.4.2 KitKat. A quick list of the main features in Omega is given below and we are sure you’d love to use this on your Galaxy S5 G900F:
          • Based on firmware XXU1ANCF Android 4.4.2 (Date: 31/03/2014)
          • Kernel stock
          • Busybox
          • Aroma Installer with Full wipe option
          • Wipe cache partition automatic before roms installation
          • Wipe Dalvik Cache automatic during installation
          • Wipe preload partition automatic before roms installation
          • Wipe System automatic before roms installation
          • Omegas Emblem Bootanimation by our artist anbech
          • Omegas Emblem Shutdown animation by our artist anbech
          • OmegaDroid Kit Kat Wallpapers by our artist Jorq1H
          • OmegaDroid Wallpapers application
          • Mods:
          • Disable scrolling cache
          • Email with Exchange Security Disabled
          • build.prop tweaks
          • Omegas addon applications:
          • Omega Files
          • OmegaDroid
          • ES File Explorer
          • Removed:
          • Knox
          • Removed (Can be added from Omega Files):
          • Boot sound
          • Rom is Deodexed + Rooted + Zipaligned
          Like this Omega v1.2 XXU1ANCF Android 4.4.2 based on the latest Google Android 4.4? We love it too and we know you are looking forward to install it on your phone now. Now please read below for important tips on how to make sure your installation goes smooth and you do not end up with any problems.

          Samsung Galaxy S5 G900F USB Drivers

          You will need to connect your Android phone with the computer. For that, please make sure you have installed the USB drivers for Samsung Galaxy S5 G900F properly. If not, you can download the latest official drivers from our Android USB Drivers section here:

          Download Samsung Galaxy S5 G900F USB drivers!

          Backup and Other Important Tips

          Always backup your important data that you might need after you install a new custom ROM, an official software update or anything else. Make a backup for just in case, you never know when anything may go wrong. See below for some tips on how to backup data:
           Samsung users can also back up data using Samsung KIES. If you backup data manually, you get more options what to choose from and it is very easy to move data across Android devices from different manufacturers, i.e moving Samsung Galaxy S3 backup data to HTC One X.
              If you already have a custom recovery (ClockworkMod, TWRP etc.) installed on your phone, we strongly recommend a backup using that as it creates a complete image of your existing phone set up.

           A few more optional tips that you should remember:

                  1. Having problems connecting your Android phone to the computer? You need to enable USB debugging mode.

                  2. Make sure your Android device is charged up to 80-85% battery level. Why? Because, if your phone goes off suddenly while installing a custom ROM, flashing an official firmware update or installing mods etc. — your phone might get bricked or go dead permanently. No one wants that, right?

                  3. Most of the tutorials and how-to guides on MyTrickSource are for factory unlocked Android phones and tablets. We recommend NOT to try our guides if your phone is locked to a carrier, unless we have specified the carrier name or device model.

          If you find the above tips useful and they were helpful to you, please consider giving us a +1 or LIKE on facebook to thank us!


          All set and ready? Sensible. Now, let’s proceed with the tutorial below and update Galaxy S5 G900F to Omega v1.2 XXU1ANCF Android 4.4.2 Custom ROM

          How to Install Omega v1.2 Android 4.4.2 Custom ROM in Galaxy Core Duos I8262 :

          We have put together a detailed step-by-step instructions guide on how to install Omega v1.2 Custom Firmware on Galaxy Core Duos. If you are used to installing custom ROMs on your Galaxy S5 G900F, then this should not be any difficult for you.


          However, for beginners, you need to root your Galaxy S5 G900F and install a custom recovery. Please Google that up if you are unsure and make sure you read the tutorial once before actually performing it on your device.

          To Remember:
          • This tutorial is only for installing Android 4.4.2 Omega Custom Firmware on Samsung Galaxy S5 G900F. Please do not try on any other Galaxy variants.
          • Your phone should be rooted and have ClockworkMod recovery installed from before. [Highly Recommended] See here >> How to Install ClockworkMod Recovery 6 on Galaxy S5 G900F
          • This tutorial will wipe out all your data. Proceed at your own risk.
          • Perform a Dalvik Cache wipe before proceeding from the recovery mode.
          • Samsung KIES will NOT detect your phone after installing this ROM because it is a custom firmware.
          • Make sure you backup all your data in your phone before proceeding.

          Entire Step-By-Step directions:

          Step 1 - Download Omega Android 4.4.2 ROM and Google Apps for Galaxy S5 G900F on your computer.

          Step 2 Connect and mount your Galaxy Core Duos I8262 USB memory on your computer using the USB cable.

          Step 3 - Now copy/paste the downloaded Android 4.2.2 zip file to your SD card. Make sure the file is in the SD card root (not in any folder).

          Step 4 - Then turn OFF your phone and disconnect from the USB cable.


          Step 5 - Now to get in the Recovery Mode. Switch ON the phone while pressing and holding Volume Up + Home + Power buttons together. You will get an exclamation mark now. Again, hold your Volume Up + Power buttons. You should now be in your Recovery Mode.


          Step 6 - Once you are in ClockworkMod Recovery, select perform a full data wipe by selecting “wipe data/factory reset”  Use the Power button to select everything while in the Recovery Mode.


          Step 7 - Then, perform a cache wipe by selecting “wipe cache partition” carefully.


          Step 8 - Now this is optional, but it is recommended to perform a wipe of your dalvik cache as well. You will not get into boot loops or any other errors. From CWM recovery, go to ‘advanced’ and then select “wipe dalvik cache”.


          Step 9 - Then go back to the main recovery screen and select “install zip from SD card”.


          Step 10 - Now select “choose zip from sdcard”. Using your volume keys, navigate to the Android 4.4.2 ROM zip file that you copied to your SD card and select it using the Power button. Confirm the installation on the next screen and the installation procedure should start now.


          Note: Repeat the same process with Google Apps as well as you did in step 10.


          Step 11 - After the installation completes, go to “+++++Go Back+++++” and reboot the phone by selecting “reboot system now

          Your Samsung Galaxy Core Duos I8262 will boot now and it might take about 5 minutes to boot on your first time. So, please wait.

          That’s it! Your Galaxy S5 G900F should now have Android 4.4.2 Omega Custom Firmware installed on your phone! Go to Settings > About phone to verify.

          Need Help?

          If you run into any problems during Updating Samsung Galaxy S5 G900F to Android 4.4.2 Omega Custom Firmware, feel free to drop us a comment below and we will reply you back ASAP with the fix or the answer to your drawback.
          Read More